
A convenient way to remotely access and manage a Mikrotik router that is behind NAT is to set it up as an OpenVPN client. It will then be accessible from the VPN server or by other VPN clients. In this guide we’ll document a procedure for setting up an OpenVPN server in Docker and configure it to work with Mikrotik.
There are a few limitations in Mikrotik’s implementation of OpenVPN client that we need to keep in mind:
- It only supports TCP and not UDP
- TLS-Auth is not supported
- Comp-LZO is not supported
- Limited authentication algorithms and ciphers are supported
Server Setup
Assuming Docker is already installed on the server, create a variable to be used subsequently:
OVPN_DATA="ovpn-data"
Create a Docker volume which will keep all the OpenVPN files, certificates and keys so that starting, stopping and updating the container does not affect these files:
docker volume create --name $OVPN_DATA
Define server IP, protocol, port and OpenVPN topology (we are using TCP port 1194):
docker run -v $OVPN_DATA:/etc/openvpn --log-driver=none --rm kylemanna/openvpn ovpn_genconfig -e 'topology subnet' -u tcp://<Server IP>:1194
Build the Certificate Authority:
docker run -v $OVPN_DATA:/etc/openvpn --log-driver=none --rm -it kylemanna/openvpn ovpn_initpki
Enter a passphrase for security. Press Enter through all the prompts.
Adjust OpenVPN server configurations:
docker volume inspect ovpn-data
This command will provide the actual location of OpenVPN volume’s files as the “Mountpoint” parameter. Navigate to this folder:
cd /var/lib/docker/volumes/ovpn-data/_data
nano openvpn.conf
Modify the OpenVPN server configurations as follows:
Comment the tls-auth line:
#tls-auth /etc/openvpn/pki/ta.key
Add cipher directive:
cipher AES-128-CBC
For allowing multiple clients to use the same certificate and key (optional):
duplicate-cn
Comment the comp-lzo directive:
#comp-lzo no
Comment all the push configurations:
#push "block-outside-dns"
#push "dhcp-option DNS 8.8.8.8"
#push "dhcp-option DNS 8.8.4.4"
#push "comp-lzo no"
Save and exit.
The complete OpenVPN file is given below for reference:
server 192.168.255.0 255.255.255.0
verb 3
key /etc/openvpn/pki/private/<Server IP>.key
ca /etc/openvpn/pki/ca.crt
cert /etc/openvpn/pki/issued/<Server IP>.crt
dh /etc/openvpn/pki/dh.pem
#tls-auth /etc/openvpn/pki/ta.key
key-direction 0
keepalive 10 60
persist-key
persist-tun

proto tcp
# Rely on Docker to do port mapping, internally always 1194
port 1194
dev tun0
status /tmp/openvpn-status.log

cipher AES-128-CBC
duplicate-cn

user nobody
group nogroup
#comp-lzo no

### Route Configurations Below
route 192.168.254.0 255.255.255.0

### Push Configurations Below
#push "block-outside-dns"
#push "dhcp-option DNS 8.8.8.8"
#push "dhcp-option DNS 8.8.4.4"
#push "comp-lzo no"

### Extra Configurations Below
topology subnet
Initialize the Docker container:
docker run -v $OVPN_DATA:/etc/openvpn -d -p 1194:1194/tcp --cap-add=NET_ADMIN kylemanna/openvpn
Client Setup:
docker run -v $OVPN_DATA:/etc/openvpn --log-driver=none --rm -it kylemanna/openvpn easyrsa build-client-full mikrotik1 nopass
This will generate the certificate and key for client named mikrotik1. The CA’s passphrase would also need to be entered. The nopass option is for adding a password-less client (i.e. their key will not be password protected).
Setup static IP for client (optional):
echo "ifconfig-push 192.168.255.10 255.255.255.0" | docker run -v $OVPN_DATA:/etc/openvpn -i --rm kylemanna/openvpn tee /etc/openvpn/ccd/mikrotik1
With this configuration the client mikrotik1 will always get the static IP 192.168.255.10 upon connection.
Mikrotik Client Setup
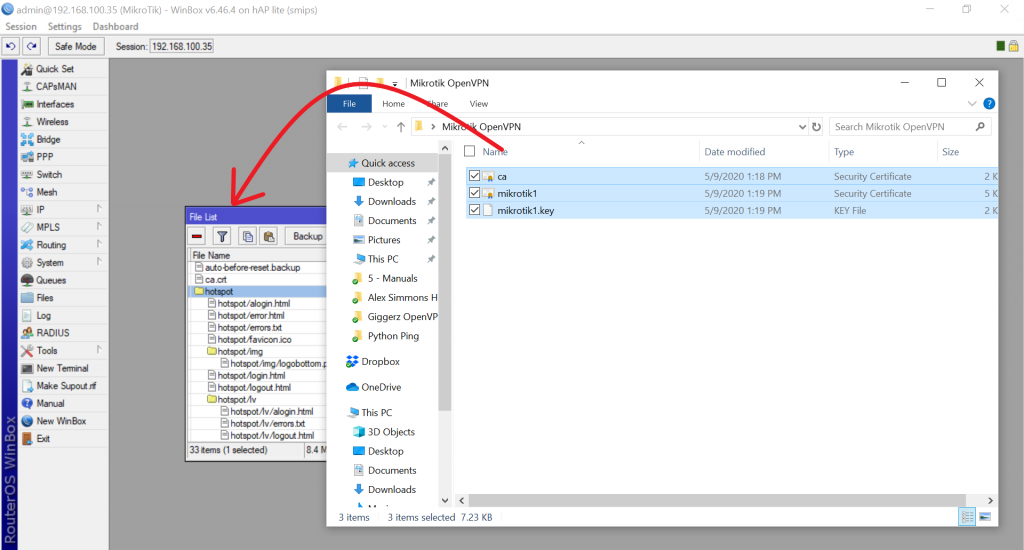
Copy certificates and keys from OpenVPN server to Mikrotik router.
Go to OpenVPN server’s volume mountpoint and download these three files to your local computer:
ca.crt
mikrotik1.crt
mikrotik1.key
Their paths are given below:
| File | Path |
| ca.crt | /var/lib/docker/volumes/ovpn-data/_data/pki |
| mikrotik1.crt | /var/lib/docker/volumes/ovpn-data/_data/pki/issued |
| mikrotik1.key | /var/lib/docker/volumes/ovpn-data/_data/pki/private |
Open Mikrotik router using Winbox and drag and drop these files:
Install Certificates:
Go to System -> Certificates and import ca.crt:
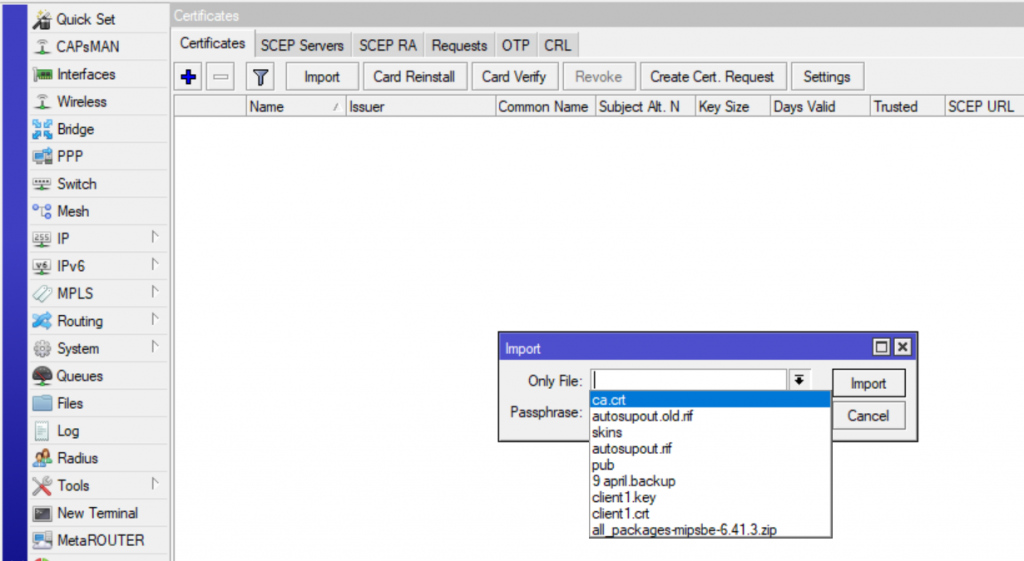
The passphrase for CA will also have to be entered.
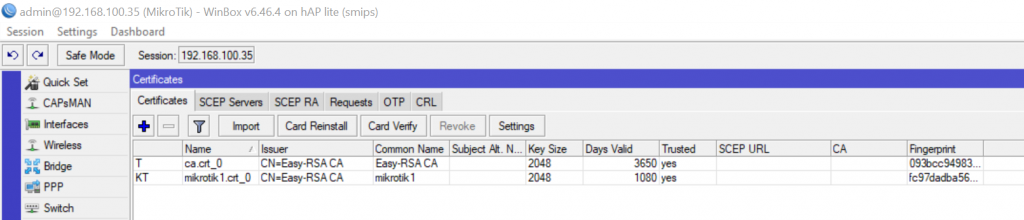
Similarly import mikrotik1.crt and mikrotik1.key (passphrase will not be required for importing these).
Create an OVPN Client connection:
Go to PPP -> Interface and add a new “OVPN Client” interface. Give it a name of your choice. Go to “Dial Out” tab and set the following properties:
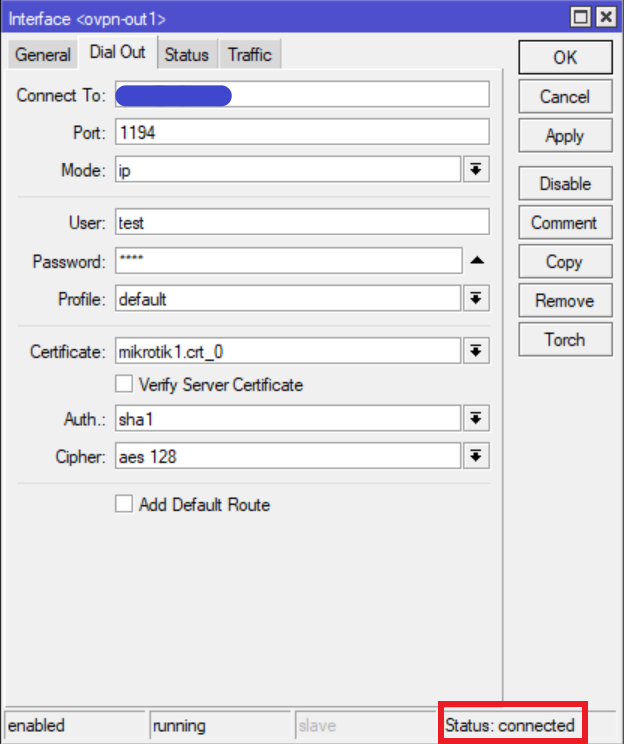
The IP address/hostname of the server needs to be entered in the “Connect To” field. The username and password can be anything; it doesn’t really matter. However, they are mandatory and cannot be left blank. If everything went well your VPN should be connected.
Troubleshooting
To troubleshoot you can go to OpenVPN server and run the following command to see logs related to OpenVPN:
docker logs -f <container_ID or name>
Any errors encountered during connection will be displayed here.
Leave a Reply